Tales From a Backyard Front: Experiences & Insights from Colorado’s Intellectual and Developmental Disabilities System
Creative Break - DIY Festive Stamp Roller!
NOTE: Arc Thrift Stores is not responsible for the content of guest blogs that appear on the site.
Guest Blog by Jo Booms
Looking for a fun way to make Christmas cards and other ink stamping projects? Look no further!
In this project, we use craft foam, a rolling pin, an unused pencil eraser, and ink pads to create stampings you can use to make holiday cards. Holly leaves cut out of a sheet of craft foam glued to a rolling pin make a rollable set of stamps – and an unused pencil eraser and a red ink pad make for quick and easy holly berries!

You will need:
- A pencil with an unused eraser
- Craft foam, the kind that comes in sheets
- A wooden rolling pin to use just for this project (check your local arc Thrift store!)
- An ultra-fine-tipped black Sharpie marker
- Tape
- A sandwich baggie
- A red ink pad
- A green ink pad
- Elmer’s School Glue
- Paper towels (to wrap the inked rolling pin in after use)
- Regular paper or construction paper
- Scissors
Instructions:
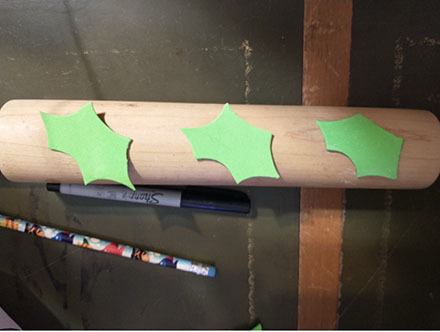
- Using the black fine-tipped Sharpie, draw eight holly leaves on the foam sheets to make stamps, like so:

- Cut out each foam holly leaf. These will be the stamps that you will glue onto the rolling pin.
- Before gluing each holly leaf onto the rolling pin, set the foam leaves on the rolling pin to determine how you’d like them spaced to make your design.
- Using the Elmer’s School Glue, spread glue evenly onto the back of one holly leaf. Glue each holly leaf, one at a time, onto the rolling pin. You will need to hold each holly leaf on the rolling pin as the glue dries. If you want to take a shortcut, you can hold each holly leaf on the rolling pin until the glue is tacky, then wrap a sandwich bag around the rolling pin and affix it with tape to hold the holly leaf in place while the glue dries.
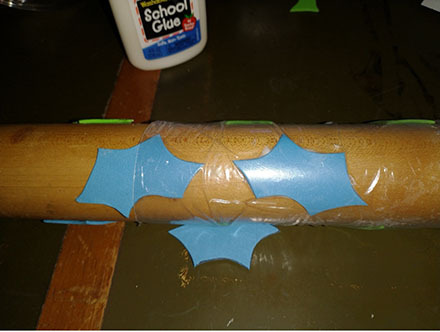
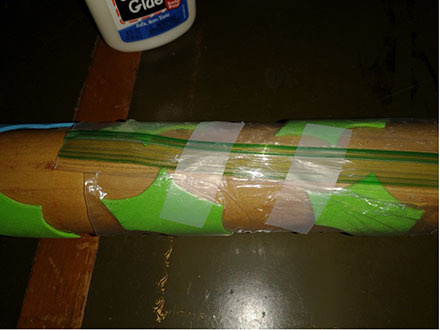
- After the foam holly leaves have all been glued to the rolling pin, leave overnight so the glue sets fully!
- Now you’re ready to stamp!
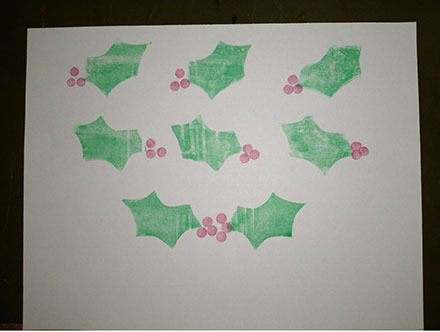
- Roll each holly leaf on the green ink pad firmly.
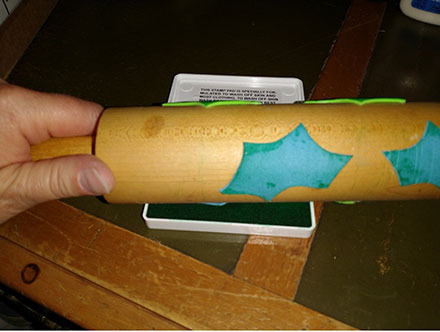
- Now, set the rolling pin at the top of your paper and roll downwards, being sure to exert pressure so the ink rolls onto the paper smoothly.
- Add three holly berries to each holly leaf by pressing an unused pencil eraser onto a red ink pad and then stamping each berry next to your inked holly leaves!
The great thing about this project is that it’s so versatile. I used holly leaves and berries, but really, you can make any design you want to. Just draw your design onto craft foam, cut the design out, glue it to the rolling pin, and you’re free to make any holiday card you like!